Create actions for alerts and scheduled searches
Create actions in Logs to initiate when an alert or scheduled search triggers, such as notifying a PagerDuty group or sending a message to a Slack channel. See Actions (opens in a new tab) in the LogScale documentation for a list of the supported tools and incident management platforms you can create actions for.
Prerequisites
Some actions require additional configuration in a third-party app before creating an action in Logs, such as configuring a Slack app (opens in a new tab) or creating a PagerDuty service (opens in a new tab). Complete those steps before creating the associated action in Logs.
If you need to access external LogScale configuration tasks, such as creating an action template or installing a LogScale package, click Repository settings in Logs to display the full LogScale product.
Create an action
Select from the following methods to create an action for a logs alert.
To create an action in Observability Platform:
- In the navigation menu select Explorers > Logs Explorer.
- Click Logs Automation to display the Logs alerting capabilities.
- On the Logs Automation page, click Actions and then click New action.
- Enter a name for your action and select the action type. Select one of the
following options:
- Empty action: Start with a blank action, select the action type (such as email, Slack, or PagerDuty), and configure or set the action parameters.
- From template: Use an existing action template or upload a template that you previously exported. LogScale supports message templates for email, Slack, and webhook actions. See message template and variables (opens in a new tab) in the LogScale documentation for more information.
- From package: Use an existing action defined in an installed LogScale package. See views and packages for more information about creating packages.
- Follow the prompts for the action type you selected and complete all required fields.
- Click Create action to create the action.
After creating an action, you can create an alert or a scheduled search and assign the action.
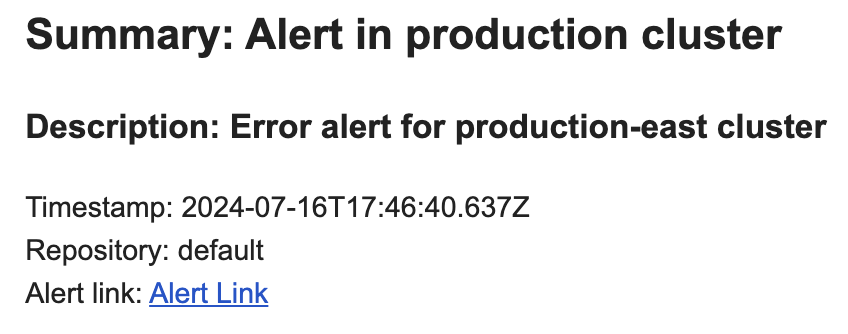
Email action example with variables
The following example defines an email action that includes message variables (opens in a new tab). Use these variables as placeholders to replace values in your generated alert.
When creating the email action in Logs Explorer, select the Use custom email template checkbox to define a custom email body and enter supported variables.
The following example uses HTML markup to format the generated alert message. You can format messages without HTML, but the message displays on a single line and is difficult to read. Using HTML markup creates a more structured message that’s especially suited to email alerts.
When defining the email body, construct an alert link to include in the generated email. The link opens the defined query in Logs Explorer and navigates users directly to the query from the associated alert.
<html>
<body>
<h2>Summary: {alert_name} </h3>
<h3>Description: {description} </h3>
<p>
Timestamp: {triggered_timestamp} <br>
Repository: {repo_name} <br>
Alert link: <a href="https://ADDRESS.chronosphere.io/logs-explorer?repo={repo_name}&query=%7B%22queryString%22%3A%22{query_string}%22%2C%22live%22%3Afalse%2C%22parameterArgs%22%3A%7B%7D%2C%22start%22%3A%22{query_time_start}%22%7D">Alert Link</a> <br>
</p>
</body>
</html>
The generated email replaces each of the defined variables with values from the alert that’s linked to the action. The following image shows the rendered email:
Construct the alert link
You can use message variables in the alert link itself. Use the following examples to construct alert links using either absolute or relative time ranges.
The URL in Logs Explorer uses URL-encoded characters that can be difficult to parse visually. You can use a tool such as URL Decoder (opens in a new tab) to encode and decode the URL when constructing alert links.
Absolute time range
If you want to specify an absolute time range, use the following syntax for the alert
link. Use the {query_start_ms} variable for the start of the query and
{query_end_ms} to indicate the end of the query period.
You must also include the query start time at the end of the URL by specifying
&start=%22{query_start_ms}%22.
https://ADDRESS.chronosphere.io/logs-explorer?repo={repo_name}&query=%7B%22queryString%22%3A%22{query_string}%22%2C%22live%22%3Afalse%2C%22parameterArgs%22%3A%7B%7D%2C%22start%22%3A%22{query_start_ms}%22%2C%22end%22%3A%22{query_end_ms}%22%7D&start=%22{query_start_ms}%22Replace ADDRESS with your company name prefixed to your Observability Platform
instance.
The generated link replaces each of the included variables as follows:
{repo_name}: The name of the repository where the query ran, such asdefault.{query_string}: The actual query defined in the alert.{query_start_ms}: The actual query start time as Unix Time in milliseconds.{query_end_ms}: The actual query end time as Unix Time in milliseconds.
For visual reference, the decoded version of the URL is:
https://ADDRESS.chronosphere.io/logs-explorer?repo={repo_name}&query={"queryString":"{query_string}","live":false,"parameterArgs":{},"start":"{query_start_ms}","end":"{query_end_ms}"}&start="{query_start_ms}"Relative time range
Use the following encoded syntax as a template when constructing the URL for an alert link with a relative time range:
https://ADDRESS.chronosphere.io/logs-explorer?repo={repo_name}&query=%7B%22queryString%22%3A%22{query_string}%22%2C%22live%22%3Afalse%2C%22parameterArgs%22%3A%7B%7D%7D&start={query_time_start}Replace ADDRESS with your company name prefixed to your Observability Platform
instance.
The generated link replaces each of the included variables as follows:
{repo_name}: The name of the repository where the query ran, such asdefault.{query_string}: The actual query defined in the alert.{query_time_start}: The time window defined in the alert, such as1d.
For visual reference, the decoded version of the URL is:
https://ADDRESS.chronosphere.io/logs-explorer?repo={repo_name}&query={"queryString":"{query_string}","live":false,"parameterArgs":{}}&start={query_time_start}Terraform action examples
The following examples provide some Terraform resources for different types of actions you can create and configure. See Actions (opens in a new tab) in the LogScale documentation for a list of the supported tools and incident management platforms you can create actions for.
Email action
The following resource creates an
email action (opens in a new tab)
that Terraform refers to as customer_email_action.
resource "chronosphere_logscale_action" "customer_email_action" {
  repository = "my-repository"
  name       = "email action"

  email_action {
    recipients       = ["email@example.com"]
    subject_template = "Alert for production environment"
    body_template    = "An alert in production environment triggered"
    attach_csv       = true
    use_proxy        = false
  }
}
LogScale repository action
The following resource creates a
LogScale repository action (opens in a new tab)
that Terraform refers to as example_humio_action.
resource "chronosphere_logscale_action" "example_humio_action" {
  repository = "my-repository"
  name       = "Logs for a repository"

  humio_action {
    ingest_token = "API_TOKEN"
  }
}
Replace API_TOKEN with the API token for authenticating with Observability
Platform.
Opsgenie action
The following resource creates an
Opsgenie action (opens in a new tab)
that Terraform refers to as example_ops_genie_action.
resource "chronosphere_logscale_action" "example_ops_genie_action" {
  repository = "my-repository"
  name       = "ops genie action"

  ops_genie_action {
    api_url = "[https://api.opsgenie.com/your-url](https://api.opsgenie.com/your-url)"
    ops_genie_key = "key"
    use_proxy = false
  }
}
PagerDuty action
The following resource creates a
PagerDuty action (opens in a new tab)
that Terraform refers to as example_pagerduty_action.
resource "chronosphere_logscale_action" "example_pagerduty_action" {
  repository = "my-repository"
  name       = "pagerduty action"

  pager_duty_action {
    severity = "ERROR"
    routing_key = "routing_key"
    use_proxy = false
  }
}
Slack action
The following resource creates a
Slack action (opens in a new tab)
that Terraform refers to as example_slack_action.
resource "chronosphere_logscale_action" "example_slack_action" {
  repository = "my-repository"
  name       = "slack action"

  slack_action {
    url = "[https://slack.com/your-url](https://slack.com/your-url)"
    fields = {
      "field1": "value1",
    }
    use_proxy = false
  }
}
Slack post message action
The following resource creates an Slack post message action that Terraform refers to as
example_slack_post_message_action.
resource "chronosphere_logscale_action" "example_slack_post_message_action" {
  repository = "some-repo"
  name       = "slack post message action"

  slack_post_message_action {
    api_token = "API_TOKEN"
    channels = ["slack-channel"]
    fields = {
      "field1": "value1",
    }
    use_proxy = false
  }
}
Replace API_TOKEN with the API token for authenticating with Observability
Platform.
Upload file action
The following resource creates an
upload file action (opens in a new tab)
that Terraform refers to as example_upload_file_action.
resource "chronosphere_logscale_action" "example_upload_file_action" {
  repository = "my-repository"
  name       = "upload file action"

  upload_file_action {
    file_name = "FILE_NAME"
  }
}
Replace FILE_NAME with the name of the file you want to upload.
VictorOps action
The following resource creates a
VictorOps action (opens in a new tab)
that Terraform refers to as example_victor_ops_action.
resource "chronosphere_logscale_action" "example_victor_ops_action" {
  repository = "my-repository"
  name       = "victor ops action"

  victor_ops_action {
    message_type = "message_type"
    notify_url = "[https://victorops.com/your-url](https://victorops.com/your-url)"
    use_proxy = false
  }
}
Webhook action
The following resource creates a
webhook action (opens in a new tab)
that Terraform refers to as example_webhook_action.
resource "chronosphere_logscale_action" "example_webhook_action" {
  repository = "my-repository"
  name       = "webhook action"

  webhook_action {
    method = "POST"
    url = "[https://example.com/webhook](https://example.com/webhook)"
    headers = {
      "Header-1": "value1"
    }
    body_template = "Message to include in the body text"
    ignore_ssl = false
    use_proxy = false
  }
}